Hey there, welcome to the Share It Sunday Blog Hop! We are a group of passionate demonstrators from all corners of the world, eager to showcase our creativity with Stampin’ Up! products. Our Share It Sunday hops are a monthly highlight on the fourth Sunday, and we can’t wait to dazzle you with our latest projects. If you’re new here, a massive “Welcome” to you! Don’t dare miss out on the excitement – make sure to subscribe to my blog for more jaw-dropping blog hops. And to all you returning subscribers, thank you for your steadfast loyalty. Let’s dive into the world of creativity and let the good times roll!
This is funny😁, I listen to Christmas music year-round. Looked at the Bright and Beautiful DSP and wondered what I was going to create. The next song I heard was Frosty, the snowman. Remembered when they put the hat on and came alive, he would say, “Happy birthday!” Oh, how I got a chuckle out of that.
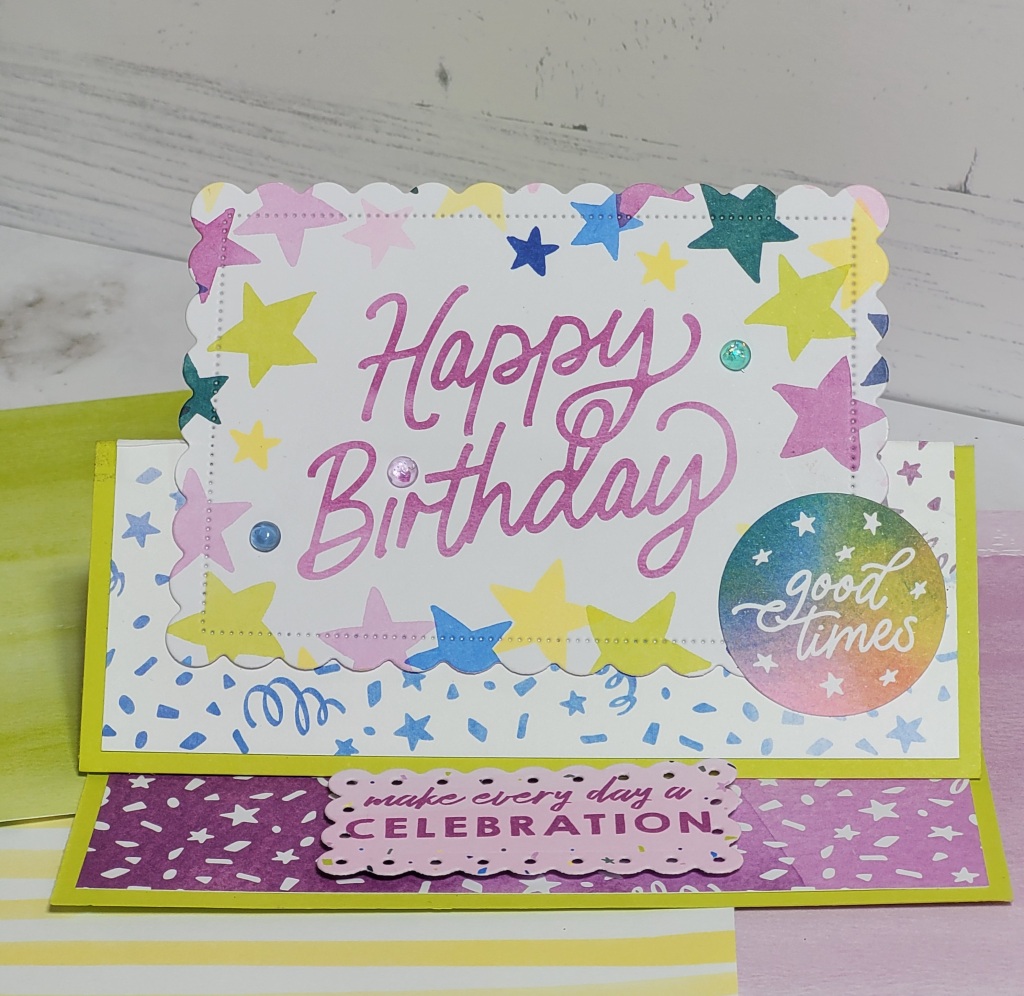
So, here is my card “Happy birthday!”

This fun festive card is full of bright and bold colors of Lemon Lime Twist, Azure Afternoon, Pretty Peacock, Blueberry Bushel, and Berry Burst.

This card is a simple fun fold and uses the Bright and Beautiful Cards and More Memories pack. Used the Nested Essential Dies with this card also. Finished the card using the three-pack tinsel gems and a sticker from the pack. This card is fast to put together because there is no stamping involved!

Supplies and step-by-step instructions:
- Lemon Lime Twist Cardstock
- Bright & Beautiful DSP
- Bright & Beautiful Memories & More Card Pack
- Tinsel Gems Three-Pack
- Scalloped Contours Dies
- Multipurpose Glue
- Stampin’ Dimensionals
- Paper Trimmer
- Cut the lemon lime twist cardstock to 8-1/2″ x 5-1/2″ and score at 2-1/8″ and 4-1/4.”
- Take a piece of the bright & beautiful dsp and cut it to 4″ x 5-1/4″ and adhere over the front of the card (this has the score line on it.)
- Take one of the bright and beautiful memories and more card that says “Happy Birthday” and with the second largest scalloped contours die (see diagram), die cut it out. Adhere to the bottom of the card front below the score line with multipurpose glue.
- Now find the “good time” sticker and place it on the right-hand bottom corner of the die-cut image (see photo.) Adhere to the card front three, one of each color, tinsel gems.
- Take a piece of another dsp cut it down to 4″ x 5-1/4″ and adhere to the bottom of the card base with multipurpose glue.
- Find bright & beautiful memories & more card that says “Make every day a celebration” and die-cut them down with small contours dies (see diagram.) Adhere it the bottom of the card base with dimensionals. This will prop the card up (see photo.)
Let’s head on over to Diane Evans-Stampin with Diane (Canada) to see her Share it Sunday project.
https://blogcarousel.com/?14P1=embed&mode=js~Thanks for stopping by-Donna Schnees~
Sit Back, Relax, Enjoy a Cup of Latte, and a Cupcake!
You can receive this month’s tutorial of 43 projects for FREE with a $50.00 purchase, or you have the option to simply buy the tutorial for $20.00. Reach out to me via email at clstampers@gmail.com, and I will promptly send you an invoice for the tutorial.
- What is included in the bundle?
- Supply List
- Measurements
- Full-color photos of each project
- and step-by-step instructions (one or more will have included video links)

This will be emailed to those who earned it with a qualifying order at the end of each month.


Get prepared for the upcoming Paper Pumpkin of the quarter! Exciting new dies that perfectly complement this quarter’s products and brace yourself for the 2024-2026 In Colors set to star in the June Paper Pumpkin kit! Yes, that’s right, brand new In Colors are on the horizon!

You can also purchase the matching dies if you have not already done so. You must be a subscriber to Paper Pumpkin to order these dies.
Looking for more than just a monthly subscription? Get ahead with our 3, 6, or 12-month options! Take your pick and commit to success.
Two New Kits Collections Added for April


2024-2025 Annual Catalog
If you live in the U.S. and do not have a Stampin’ Up! Demonstrator, please contact me. Will be happy to help you with your creative projects. You may also visit my Online Store to place your order and have it shipped to your home.


