Welcome to the Technique Tuesday Blog Hop! We’re a collective of Stampin’ Up! demonstrators from around the globe, dedicated to sharing our passion with you. Through collaborative efforts, we aim to ignite your creativity and inspire you to embark on your own crafting journey. Every month, we’re tasked with exploring a specific technique, ranging from watercolor and Stampin’ blends to various forms of embossing, ribbons, designer series paper, and innovative folds. The possibilities are truly limitless.
The technique we are highlighting is dry embossing. Dry embossing is the raising of a design on paper, such as Stampin’ Up! cardstock. Before embossing folders existed, you used a stencil and a stylus to create your embossed image. You used the stylus to start pushing the paper to make your image pop by tracing the edge of the design and when you flip the paper over you have an embossed image. Then the light box came around so you could see the stencil lines better for tracing. And now with today’s technology, we have embossing machines from hand or electric cranks for embossing folders or die-cutting machines that can also emboss with a special stylus and rubber mat to use with it.
Stampin’ Up has three types of embossing folders:
- Standard Embossing folder- create a uniform embossed impression.
- 3D Embossing folder- make a more varied, dimensional appearance.
- Hybrid Embossing folder- creates ornate die-cut pieces with textures in one pass by the dies fit inside unique ridges in the embossing folder for, one-step cutouts or you can just use the folder as a stand-alone.
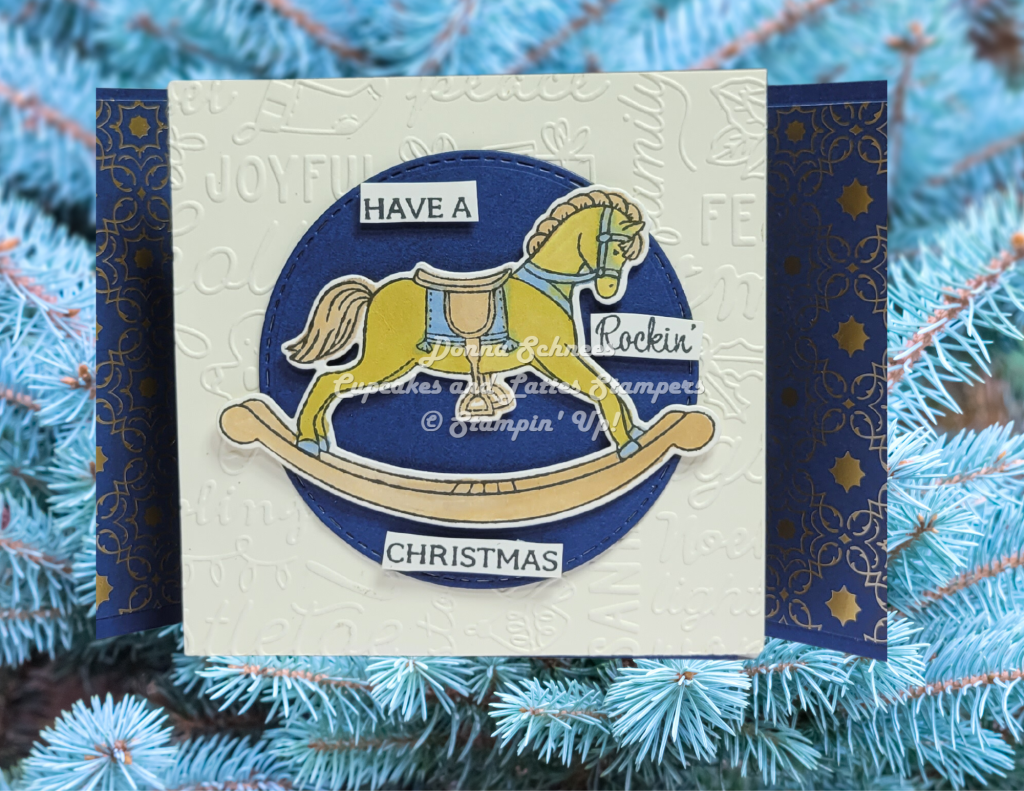
Used the Standard Embossing folder for this cute, adorable card. The fun fold featured is the “flying seagull.” This card can stand up on a shelf with the “wings” pulled out. I first saw this technique from my upline, Debra Harrison.
The embossed image is created with the Christmas Tidings embossing folder and displays a bold textured design. The folder contains holiday sentiments and words, with festive holiday images, and is embossed in the Very Vanilla cardstock.
The stamp set paired with it is the Rocking Horse stamp set and die-cut it with the Rocking Horse dies (bundle and save.) Sentiment is also from the same stamp set. Cutting the words apart to fit the card. The rocking horse is colored in with blends of Dark Wild Wheat-horse, Light Boho Blue-rein, hoofs, and saddle pad, and Light Pecan Pie-saddle, mane, tail, and rocking boards.
The card also uses Night of Navy cardstock paired with the Shining Brightly (12″ x 12″) Specialty Designer Series Paper. The paper highlights Gold Foil, Night of Navy, and Very Vanilla designs.

Card “wings” open.

Close-up of the main panel.
Supplies and step-by-step instructions:
- Two Night of Navy card bases-4-1/4″ x 8-1/4″ each one scored at 2-1/4″, 4″ and 6-1/4.”
- Very Vanilla Pop-Up Panel embossed with the Christmas Tidings folder or folder of choice- 4-1/4″ x 4-1/4.”
- Basic White Back Panel-4-1/4″ x 4-1/4″
- Two Brightly Shining Designer Series papers 2″ x 4″
- Two coordinating Brighty Shining Designer Series papers- 1-1/2″ x 4″
- Large stitched circle in Night of Navy-3″
- Rocking Horse Bundle
- Stampin’ Blends-Wild Wheat, Boho Blue, and Pecan Pie
- Memento Tuxedo Black Ink pad
- Multipurpose Glue
- Stampin’ Dimensional-mini and large
- Fold the 2-1/4″ fold on each base as a mountain fold and the other two as valleys (see diagram.)
- Take the 6-1/4″ of each card base and line them up onto each other. Add multipurpose glue to the panels and add the very vanilla panel to those pieces. This is the pop-up part.
- Add the stitched circle to the center of the embossed panel with dimensionals.
- Stamp, color, and die-cut the rocking horse. Add the rocking horse with dimensional.
- Stamp the sentiment and then die-cut the pieces apart. Add to the card front with mini dimensionals.
- Add the basic white panel to the back, this will be the writing area.
- Now add the dsp to each coordinating panel with multipurpose glue. Add any embellishments if you want to or not. The “wings” will fold in behind the panel. Your card is now complete and can be set on the ledge with the “wings’ open.
Now let’s head on over to the next demonstrator to see what they have created.
https://blogcarousel.com/?14P7=embed&mode=js~Thanks for stopping by-Donna Schnees~
Sit Back, Relax, Enjoy a Cup of Latte, and a Cupcake!
2024-2025 Annual Catalog
Two New Kits Collections Added for April


Get prepared for the upcoming Paper Pumpkin of the quarter! Exciting new dies that perfectly complement this quarter’s products and brace yourself for the 2024-2026 In Colors set to star in the June Paper Pumpkin kit! Yes, that’s right, brand new In Colors are on the horizon!

You can also purchase the matching dies if you have not already done so. You must be a subscriber to Paper Pumpkin to order these dies.
Looking for more than just a monthly subscription? Get ahead with our 3, 6, or 12-month options! Take your pick and commit to success.
You can receive this month’s tutorial of 43 projects for FREE with a $50.00 purchase, or you have the option to simply buy the tutorial for $20.00. Reach out to me via email at clstampers@gmail.com, and I will promptly send you an invoice for the tutorial.
- What is included in the bundle?
- Supply List
- Measurements
- Full-color photos of each project
- and step-by-step instructions (one or more will have included video links)

This will be emailed to those who earned it with a qualifying order at the end of each month.
If you live in the U.S. and do not have a Stampin’ Up! Demonstrator, please contact me. Will be happy to help you with your creative projects. You may also visit my Online Store to place your order and have it shipped to your home.


